- Fiverizer: convert a website from XHTML 1.0 to HTML5
- How to Convert Your Website from XHTML 1.0 to HTML5 the Quick and Easy Way
- DC Blog RSS Feed
- [Updated] Free Mobile-Friendly Layout Wizard
- [Fixed] Feedback Form Wizard
- GitHub patch release previous version
- 15 years of blogging 500 posts later
- How to disable Laravel console commands
- Vue show and hide form elements
- Extracting a time into select menus with PHP
Recent Questions

آخرین مطالب
امکانات وب
 Introduction
When working with forms, it is common to display or conceal various fields based on the options selected.
I'll use Vue to conditionally show or hide form elements.
In this example, I'm going to use an SFC (Single File Component) for ease of us. You'll see this in full in the putting it all together section below.
For this to work it does not need to use a SFC, the HTML and JS will work when used in traditional setups i.e. having JS in javascript blocks and the HTML in a page's body.
Creating the form elements
Here I have 2 select elements, imagine the insurance type should only be displayed if the answer to Do you want insurance? was Yes
<div>
<label for="insurance">Do you want insurance?</label>
<select id="insurance">
<option value="">Select</option>
<option>Yes</option>
<option>No</option>
</select>
</div>
<div>
<label for="insuranceType">Insurance Type</label>
<select id="insuranceType">
<option value="">Select</option>
<option>Home</option>
<option>Travel</option>
</select>
</div>
Binding Form Elements
First, we need to create variables to bind the elements. Inside a script tag define a const for each element.
<script setup>
import {ref} from "vue";
const insurance = ref();
const insuranceType = ref();
</script>
Notice that Recent Questions...
Introduction
When working with forms, it is common to display or conceal various fields based on the options selected.
I'll use Vue to conditionally show or hide form elements.
In this example, I'm going to use an SFC (Single File Component) for ease of us. You'll see this in full in the putting it all together section below.
For this to work it does not need to use a SFC, the HTML and JS will work when used in traditional setups i.e. having JS in javascript blocks and the HTML in a page's body.
Creating the form elements
Here I have 2 select elements, imagine the insurance type should only be displayed if the answer to Do you want insurance? was Yes
<div>
<label for="insurance">Do you want insurance?</label>
<select id="insurance">
<option value="">Select</option>
<option>Yes</option>
<option>No</option>
</select>
</div>
<div>
<label for="insuranceType">Insurance Type</label>
<select id="insuranceType">
<option value="">Select</option>
<option>Home</option>
<option>Travel</option>
</select>
</div>
Binding Form Elements
First, we need to create variables to bind the elements. Inside a script tag define a const for each element.
<script setup>
import {ref} from "vue";
const insurance = ref();
const insuranceType = ref();
</script>
Notice that Recent Questions...
ما را در سایت Recent Questions دنبال میکنید
برچسب: نویسنده: استخدام کار بازدید: 119 تاريخ: سه شنبه 25 مهر 1402 ساعت: 14:14
 That begs the question how do you separate the time into seperate elements?
Making use of explode can work. Exploding where there a : so:
$parts = explode(':', '14:25:00');
This would result in an array:
[
"14",
"25",
"00",
]
To use an element you can refer to its index for example $parts[0] would contain 14
Using them by their index is fine to do but kinda messy.
I prefer to give each element a name using the list function
list($hours, $minutes, $seconds) = explode(':', '14:25:00');
When using list() passing an array to it will allow you to name each index of the array in the order listed.
Putting this into practice I like to define the null versions before using list to ensure the variables will exist.
$estimatedTime = 14:25:00;
$estimatedHour = null;
$estimatedMinute = null;
$estimatedSeconds = null;
list($estimatedHour, $estimatedMinute, $estimatedSeconds) = explode(':', $estimatedTime);
Now we have the variables that can be used in select menus:
note I'm using Blade syntax here for readability.
<select name="estimatedTime_hour">
<option value="0">Hours</option>
@foreach(range(0,23) as $hour)
<option value="{{ $hour }}" {{ old('estimatedTime_hour', $estimatedHour) == $hour ? 'selected=selected' : '' }}>{{ $hour }}</option>
@endforeach
</select>
<select name="estimatedTime_minute">
<option value="0">Minutes&l Recent Questions...
That begs the question how do you separate the time into seperate elements?
Making use of explode can work. Exploding where there a : so:
$parts = explode(':', '14:25:00');
This would result in an array:
[
"14",
"25",
"00",
]
To use an element you can refer to its index for example $parts[0] would contain 14
Using them by their index is fine to do but kinda messy.
I prefer to give each element a name using the list function
list($hours, $minutes, $seconds) = explode(':', '14:25:00');
When using list() passing an array to it will allow you to name each index of the array in the order listed.
Putting this into practice I like to define the null versions before using list to ensure the variables will exist.
$estimatedTime = 14:25:00;
$estimatedHour = null;
$estimatedMinute = null;
$estimatedSeconds = null;
list($estimatedHour, $estimatedMinute, $estimatedSeconds) = explode(':', $estimatedTime);
Now we have the variables that can be used in select menus:
note I'm using Blade syntax here for readability.
<select name="estimatedTime_hour">
<option value="0">Hours</option>
@foreach(range(0,23) as $hour)
<option value="{{ $hour }}" {{ old('estimatedTime_hour', $estimatedHour) == $hour ? 'selected=selected' : '' }}>{{ $hour }}</option>
@endforeach
</select>
<select name="estimatedTime_minute">
<option value="0">Minutes&l Recent Questions...
ما را در سایت Recent Questions دنبال میکنید
برچسب: نویسنده: استخدام کار بازدید: 84 تاريخ: سه شنبه 25 مهر 1402 ساعت: 14:14
 Running API tests you may be tempted to open PostMan or another API client, did you know, you can run HTTP requests from inside PhpStorm directly?
When developing a new API, you will want to run the API endpoints. Being able to run them without leaving PhpStorm speeds up your workflow.
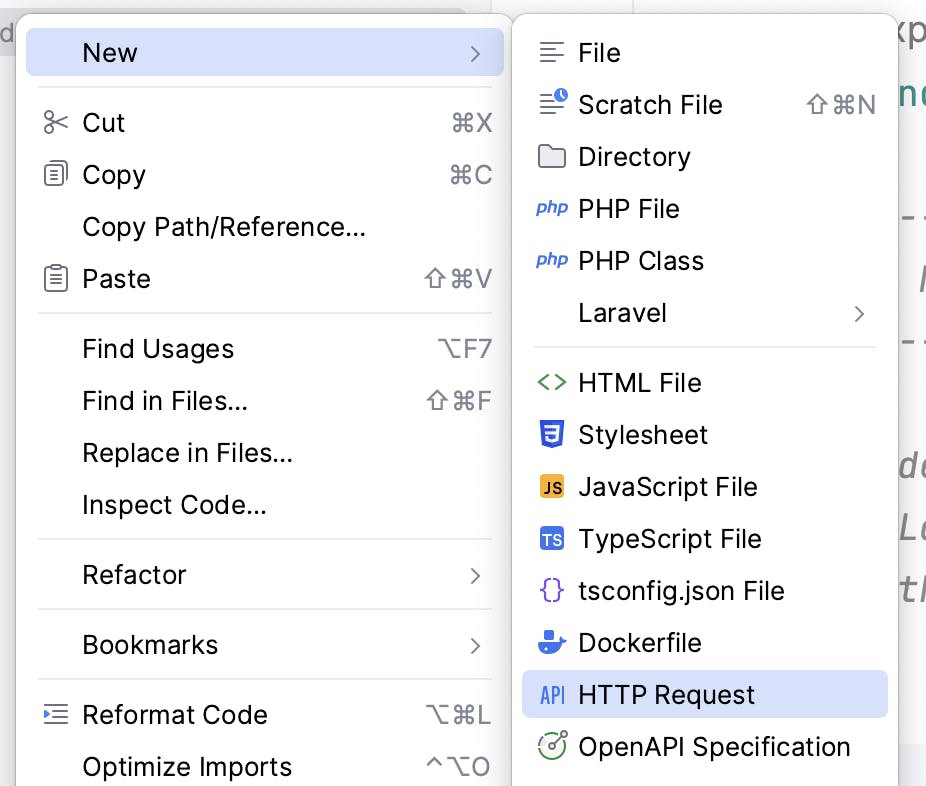
To start a request file, you can either select a HTTP Request file when using the new file or create a new scratch file.
For a scratch file select the HTTP Request type.
In either case a file ending in .http for example scratch.http You can name the file anything you like and have multiple files.
The difference between having .http files in your projects and a scratch file is a scratch file is only stored in your .idea folder and not inside your project files, (outside of version control.
Demo API
Throughout this post, I will be using a sample public API https://reqres.in/
Request Format
To create a request enter the type of request (GET, POST, PUT, PATCH, DELETE) followed by the URL to fetch.
You can also set headers by typing them in the format of key:value
If you need to pass through a body then type that out with a line break in a json format.
Use ### to separate each request.
Method Request-URI HTTP-Version
Header-field: Header-value
Request-Body
###
Get Request
To create a GET request type GET followed by the URL to fetch.
You can also set headers by typing them in the forma Recent Questions...
Running API tests you may be tempted to open PostMan or another API client, did you know, you can run HTTP requests from inside PhpStorm directly?
When developing a new API, you will want to run the API endpoints. Being able to run them without leaving PhpStorm speeds up your workflow.
To start a request file, you can either select a HTTP Request file when using the new file or create a new scratch file.
For a scratch file select the HTTP Request type.
In either case a file ending in .http for example scratch.http You can name the file anything you like and have multiple files.
The difference between having .http files in your projects and a scratch file is a scratch file is only stored in your .idea folder and not inside your project files, (outside of version control.
Demo API
Throughout this post, I will be using a sample public API https://reqres.in/
Request Format
To create a request enter the type of request (GET, POST, PUT, PATCH, DELETE) followed by the URL to fetch.
You can also set headers by typing them in the format of key:value
If you need to pass through a body then type that out with a line break in a json format.
Use ### to separate each request.
Method Request-URI HTTP-Version
Header-field: Header-value
Request-Body
###
Get Request
To create a GET request type GET followed by the URL to fetch.
You can also set headers by typing them in the forma Recent Questions...
ما را در سایت Recent Questions دنبال میکنید
برچسب: نویسنده: استخدام کار بازدید: 81 تاريخ: سه شنبه 25 مهر 1402 ساعت: 14:14
 VIM Modes
There are multiple modes in vim, normal mode is loaded by default.
Command mode. Press : from normal mode, This mode is used when escape is pressed.
Insert mode. Press i to enter insert mode, from here typing is allowed within the file.
Visual mode. Press v to enter visual mode from here you can select and move lines.
Visual line. Press capital V to enter visual line mode, this will select entire lines.
By default command mode will be loaded to run command type : followed by the command
in terminal type vim to enter vim or vi file/path to create a file or edit a file if the path already exists.
Edit File (must be inside vim for this to work)
:e file/path - open a file from a vim instance
Save and write to file
:q = quit:qw = quit and write to the file:q! = quit and discard any changes:w = write to the file aka save
from normal mode pressing a will tu on edit mode and place the cursor 1 character forward. The difference between pressing i and a is i will leave the curse in the same position whilst a will move the cursor forward a character.
Movement:
Move around by pressing these keys:
h = move left.j = move down.k = move up.l = move right.
gg = move to the top of the file.
shift + g move to the bottom of the file.
zz = move the current line to the center of the screen.
Recent Questions...
VIM Modes
There are multiple modes in vim, normal mode is loaded by default.
Command mode. Press : from normal mode, This mode is used when escape is pressed.
Insert mode. Press i to enter insert mode, from here typing is allowed within the file.
Visual mode. Press v to enter visual mode from here you can select and move lines.
Visual line. Press capital V to enter visual line mode, this will select entire lines.
By default command mode will be loaded to run command type : followed by the command
in terminal type vim to enter vim or vi file/path to create a file or edit a file if the path already exists.
Edit File (must be inside vim for this to work)
:e file/path - open a file from a vim instance
Save and write to file
:q = quit:qw = quit and write to the file:q! = quit and discard any changes:w = write to the file aka save
from normal mode pressing a will tu on edit mode and place the cursor 1 character forward. The difference between pressing i and a is i will leave the curse in the same position whilst a will move the cursor forward a character.
Movement:
Move around by pressing these keys:
h = move left.j = move down.k = move up.l = move right.
gg = move to the top of the file.
shift + g move to the bottom of the file.
zz = move the current line to the center of the screen.
Recent Questions...
ما را در سایت Recent Questions دنبال میکنید
برچسب: نویسنده: استخدام کار بازدید: 193 تاريخ: دوشنبه 10 مهر 1402 ساعت: 21:15
 I've documented my PhpStorm setup, what theme I use, plugins, and keybindings.
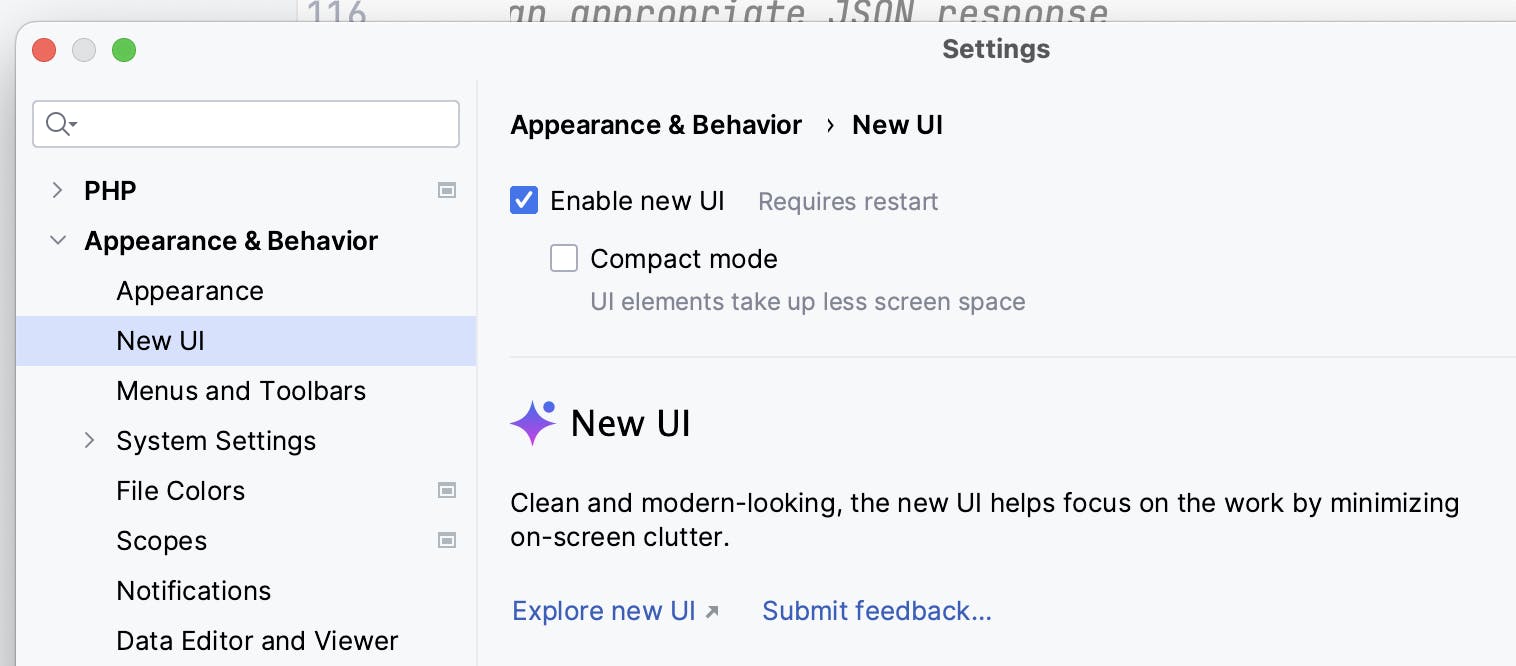
Theme
I use the New UI which is located at Appearance & Behaviour -> New UI
Once tued on I use the Light Theme:
I like to keep things minimal, in fact, I tu off the toolbars and status bars by toggling distraction-free mode
Plugins
.env file support
Environment variables completion based on .env, Dockerfile and docker-compose.yml files.
Go to declaration(in .env file) and usages(in code), by Ctrl(Cmd)+click or hotkey(Ctrl(Cmd)-B, etc.)
.env file syntax highlighter
BitBucket Pull Requests (Paid)
The plugin allows you to review Atlassian Bitbucket pull requests right in the IDE. It works with both Bitbucket Cloud and Bitbucket Server (6.x or later).
Github Codespaces
GitHub Codespaces provides a better development environment hosted in the cloud. Now you can spin up any codebase and connect from any compatible JetBrains IDE and start coding - whether it's a long-term project, or a short-term task like reviewing a pull request.
Github Copilot
GitHub Copilot provides autocomplete-style suggestions from an AI pair programmer as you code. You can receive suggestions from GitHub Copilot either by starting to write the code you want to use or by writing a natural language comment describing what you want the code to do.
Jira
This plugin provides the following functionalities:
Fetch issues from the server with customizable Recent Questions...
I've documented my PhpStorm setup, what theme I use, plugins, and keybindings.
Theme
I use the New UI which is located at Appearance & Behaviour -> New UI
Once tued on I use the Light Theme:
I like to keep things minimal, in fact, I tu off the toolbars and status bars by toggling distraction-free mode
Plugins
.env file support
Environment variables completion based on .env, Dockerfile and docker-compose.yml files.
Go to declaration(in .env file) and usages(in code), by Ctrl(Cmd)+click or hotkey(Ctrl(Cmd)-B, etc.)
.env file syntax highlighter
BitBucket Pull Requests (Paid)
The plugin allows you to review Atlassian Bitbucket pull requests right in the IDE. It works with both Bitbucket Cloud and Bitbucket Server (6.x or later).
Github Codespaces
GitHub Codespaces provides a better development environment hosted in the cloud. Now you can spin up any codebase and connect from any compatible JetBrains IDE and start coding - whether it's a long-term project, or a short-term task like reviewing a pull request.
Github Copilot
GitHub Copilot provides autocomplete-style suggestions from an AI pair programmer as you code. You can receive suggestions from GitHub Copilot either by starting to write the code you want to use or by writing a natural language comment describing what you want the code to do.
Jira
This plugin provides the following functionalities:
Fetch issues from the server with customizable Recent Questions...
ما را در سایت Recent Questions دنبال میکنید
برچسب: نویسنده: استخدام کار بازدید: 82 تاريخ: دوشنبه 10 مهر 1402 ساعت: 21:15